4 min readVersion française
Why I Migrated from Jekyll to Hugo
Why I migrated my blog from Jekyll to Hugo: a comparison of both tools, the benefit of the dependency-free Go binary, and deployment on GitHub Pages.

Contents
This blog started with Jekyll, the static site generator historically associated with GitHub Pages. After a few months of use, I decided to migrate to Hugo. Here's why, and how it works.
Jekyll vs Hugo: why switch?#
Jekyll is a solid tool, but it carries a few constraints that become painful over time.
| Jekyll | Hugo | |
|---|---|---|
| Language | Ruby | Go (single binary) |
| Installation | Ruby + Bundler + gems | One single binary |
| Build speed | Slow (seconds to minutes) | Very fast (milliseconds) |
| Dependencies | Many (gems) | None |
| Themes | Via gems or fork | Local directory or module |
| Native drafts | Partial | Native (draft: true) |
| Future dates | Native (future: false by default) | Native (buildFuture) |
The point that motivated me most: Hugo is a single binary compiled in Go. No Ruby to install, no gem version conflicts, no bundle install failing depending on the environment. Download it, run it, done.
How Hugo works#
Hugo is a static site generator: it takes Markdown files and templates and produces an HTML/CSS/JS site ready to be hosted anywhere.
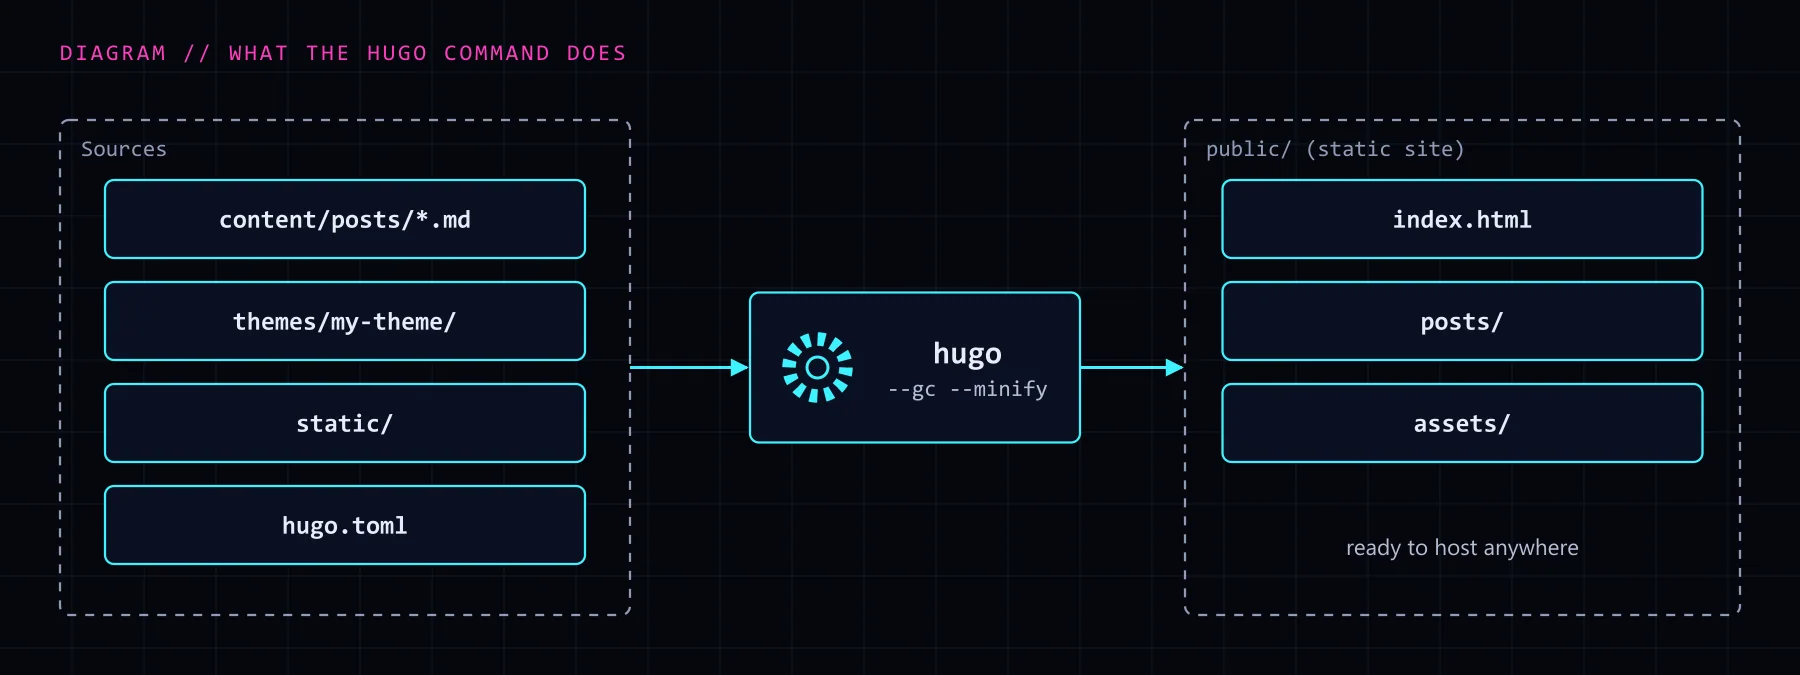
Each article is a Markdown file with a header called frontmatter (between the ---) that defines the article's metadata: title, date, tags, cover image, etc.
---
title: "My article"
date: 2026-04-28T10:00:00+02:00
draft: false
tags:
  - kubernetes
  - devops
cover:
  image: assets/images/my-image.png
  alt: "Cover image description"
---

Article content in Markdown...
Installation#
On Linux#
Hugo provides packages for common distributions. The simplest and most up-to-date method is to download the binary directly from the GitHub releases.
# Download the Extended version (required for advanced CSS themes)
HUGO_VERSION="0.147.0"
wget -O /tmp/hugo.deb \
  https://github.com/gohugoio/hugo/releases/download/v${HUGO_VERSION}/hugo_extended_${HUGO_VERSION}_linux-amd64.deb

sudo dpkg -i /tmp/hugo.deb

# Verify installation
hugo version
On Debian/Ubuntu, it's also available via apt, but often in an older version:
sudo apt install hugo
On Windows#
On Windows, the recommended method is via winget or Chocolatey:
# Via winget (built-in on Windows 11)
winget install Hugo.Hugo.Extended

# Via Chocolatey
choco install hugo-extended
Or download the .zip binary from Hugo's GitHub releases and add it to your PATH.
The extended keyword matters: the Extended version includes Sass/SCSS support, required by most modern themes.
Creating a new site#
hugo new site my-blog
cd my-blog
Generated structure:
my-blog/
├── archetypes/       ← Article templates
├── content/          ← Content (articles, pages)
├── layouts/          ← HTML templates (theme overrides)
├── static/           ← Served as-is (images, favicon...)
├── themes/           ← Themes
└── hugo.toml         ← Main configuration
Writing an article#
hugo new posts/2026-04-28-my-article.md
Hugo creates the file with the frontmatter pre-filled from the default archetype. Just open the file and write the content in Markdown.
Publishing as a draft#
While an article is being written, simply keep draft: true in the frontmatter:
---
title: "My draft article"
date: 2026-04-28T10:00:00+02:00
draft: true
---
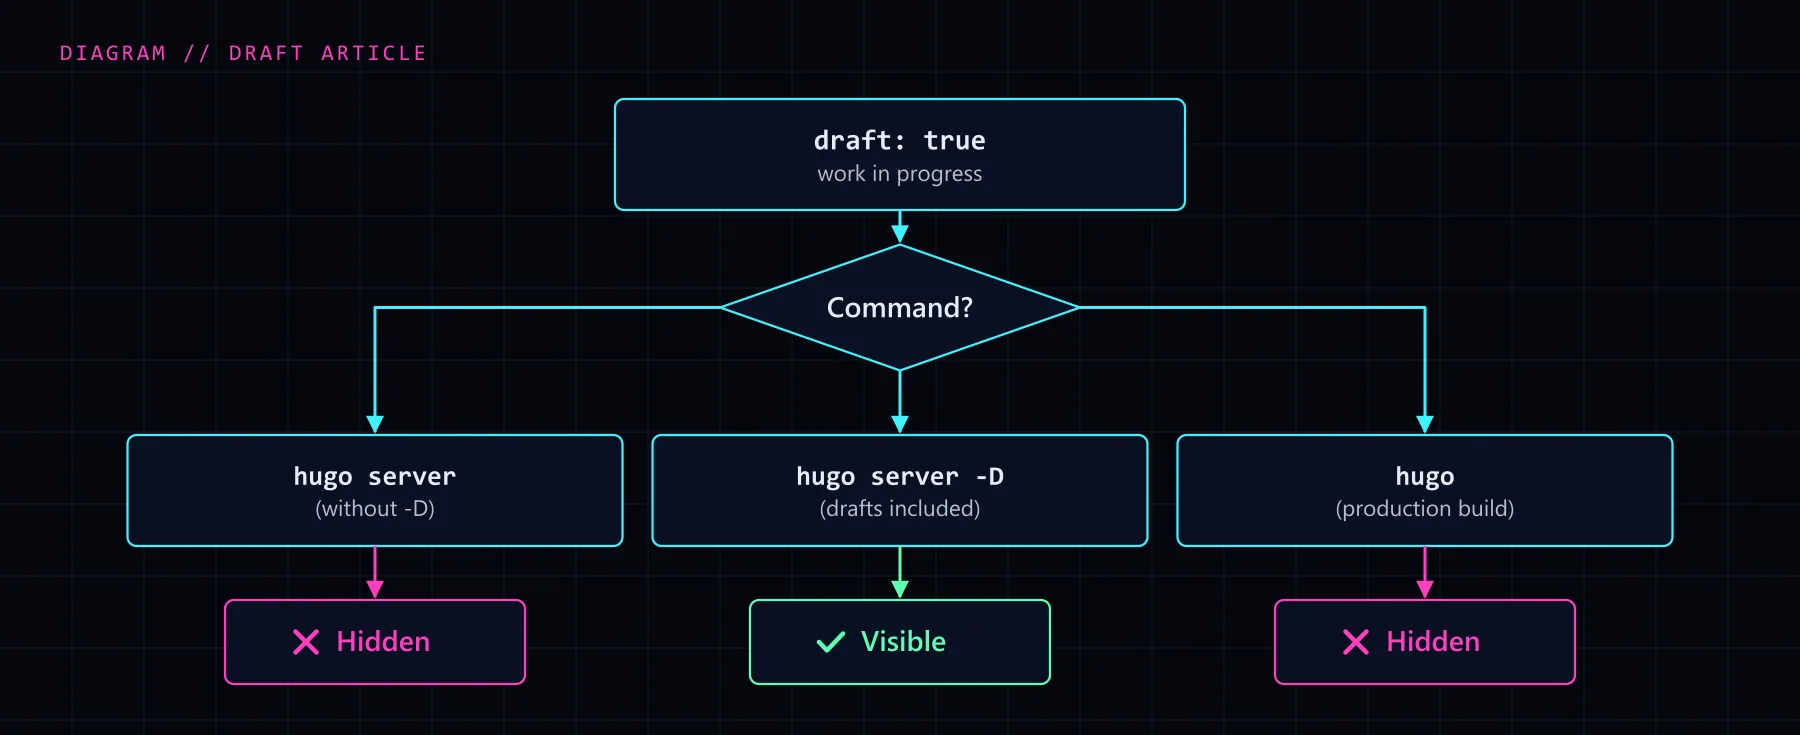
To publish the article, just switch draft: false or remove the draft line.
Publishing in the future#
Hugo also allows scheduling article publication via the frontmatter date. If the date is in the future, the article is hidden by default during the build.
---
title: "Scheduled article"
date: 2026-12-01T09:00:00+02:00
draft: false
---
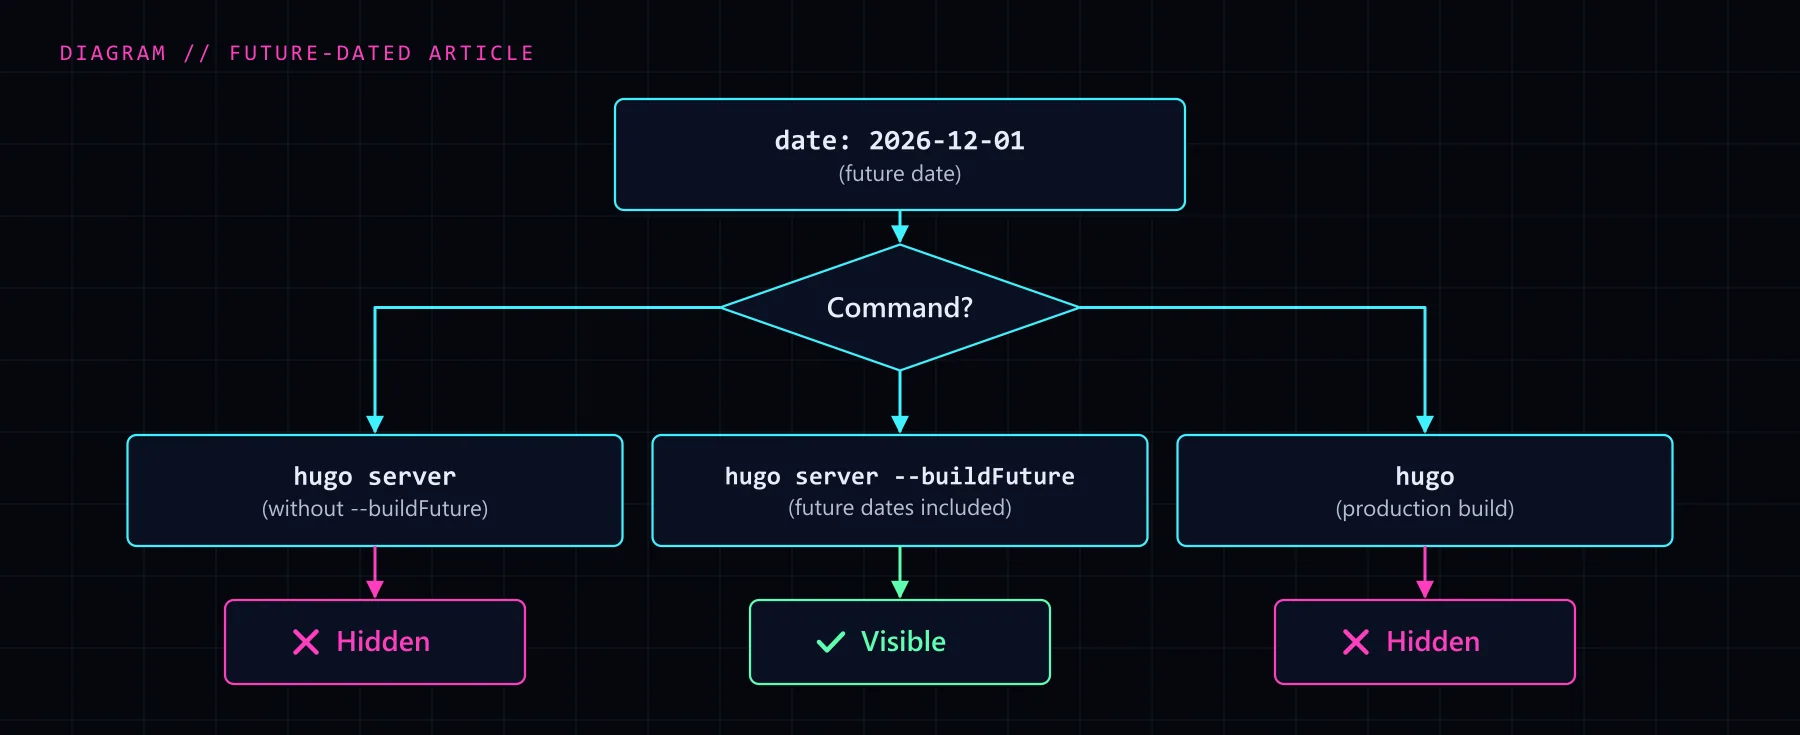
Combined with a GitHub Action that triggers daily, this enables automatic publication at the desired date without any manual intervention.
Running the development server#
# Standard mode (published articles only)
hugo server

# Include drafts
hugo server -D

# Include drafts and future-dated articles
hugo server -D --buildFuture
The server starts at http://localhost:1313 and reloads automatically on every file change.
Build and deployment#
To generate the final static site:
hugo --gc --minify
The result is in the public/ folder, ready to be deployed on any static host (GitHub Pages, Netlify, Vercel, a simple nginx server...).
Automated deployment with GitHub Actions#
GitHub Actions is a continuous integration and deployment (CI/CD) system built into GitHub. It allows automating tasks on every git push: in our case, building the site with Hugo and publishing it to GitHub Pages, with no manual intervention.
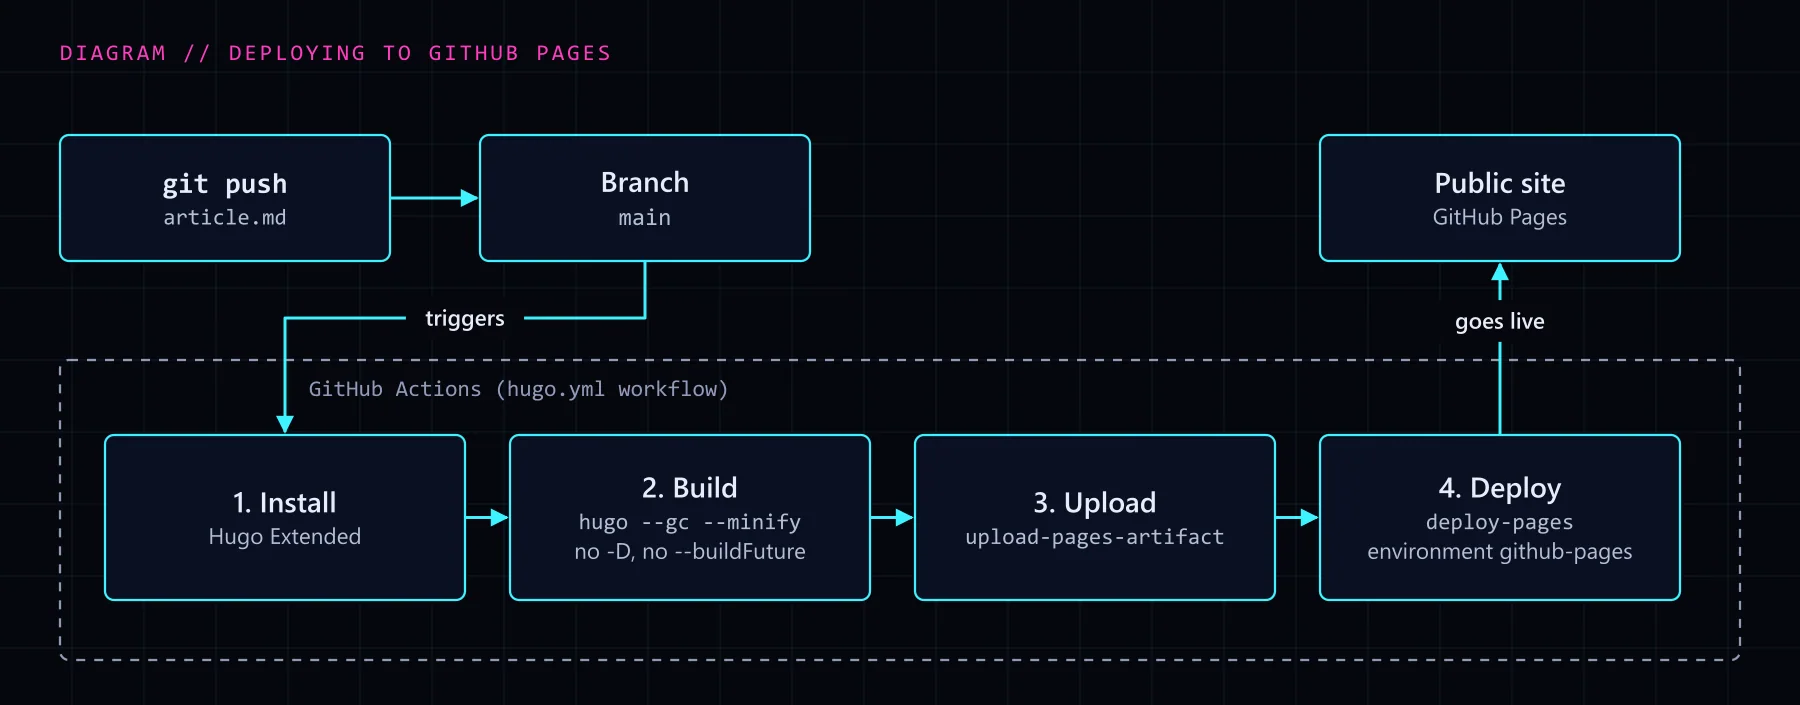
The workflow file lives in .github/workflows/hugo.yml. Here is its commented structure:
name: Deploy Hugo site to GitHub Pages

# Trigger: on every push to main branch
on:
  push:
    branches:
      - main
  workflow_dispatch: # also allows manual trigger from GitHub

# Permissions required to write to GitHub Pages
permissions:
  contents: read
  pages: write
  id-token: write

jobs:
  build:
    runs-on: ubuntu-latest
    steps:
      # 1. Install Hugo Extended on the runner
      - name: Install Hugo CLI
        run: |
          wget -O /tmp/hugo.deb \
            https://github.com/gohugoio/hugo/releases/download/v0.147.0/hugo_extended_0.147.0_linux-amd64.deb \
          && sudo dpkg -i /tmp/hugo.deb

      # 2. Checkout source code
      - name: Checkout
        uses: actions/checkout@v4

      # 3. Build the site (no drafts, no future dates)
      - name: Build with Hugo
        env:
          HUGO_ENVIRONMENT: production
        run: hugo --gc --minify --baseURL "https://mysite.github.io/"

      # 4. Upload artifact for the deploy job
      - name: Upload artifact
        uses: actions/upload-pages-artifact@v3
        with:
          path: ./public

  deploy:
    needs: build # waits for build job to complete
    runs-on: ubuntu-latest
    environment: # required by deploy-pages
      name: github-pages
      url: ${{ steps.deployment.outputs.page_url }}
    steps:
      # 5. Publish to GitHub Pages
      - name: Deploy to GitHub Pages
        id: deployment
        uses: actions/deploy-pages@v4
The key point is step 3: the hugo command is run without -D or --buildFuture. Hugo automatically excludes all articles with draft: true or a future date.
| Article | hugo server -D | GitHub Actions (prod) |
|---|---|---|
draft: false, past date | visible | published |
draft: true, past date | visible | hidden |
draft: false, future date | hidden | hidden |
draft: true, future date | hidden | hidden |
hugo server -D --buildFuture shows all rows of the table.
Articles with draft: true or a future date are never included in the production build, guaranteeing that no unwanted content ends up published by mistake.
Conclusion#
Migrating from Jekyll to Hugo was, for me, an obvious choice. The simplicity of installation, build speed, and native handling of drafts and future dates make it a much more pleasant tool to use day-to-day. If you host your blog on GitHub Pages and are still using Jekyll, the migration is definitely worth it.
Sources#
- #hugo
- #jekyll
- #blog
- #jamstack
- #github-pages